Add color presets to Customizer
It's easy to add some code to your child theme to change the palette of color presets in Customizer. The code in this procedure is not specific to Beaver Builder Theme.
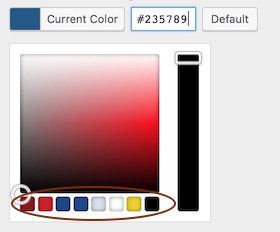
The default palette in Customizer appears below the color picker square, as shown in this screenshot. Using the code below, you can replace these boxes with your own colors.

The Iris-based color picker interface was introduced in WordPress 3.5. Customizing the color palette also changes the behavior of the color picker square and the slider on the right. The code in this procedure contains additional parameters to restore the behavior to the default. See the Iris syntax page for the syntax and options if you want to customize this code.
The procedure adds code to your child theme's functions.php file. Unless you have restricted access for security reasons, you can edit the file by going to the WordPress admin panel and choosing Appearance > Editor. Be sure you are using a child theme, so your changes aren't overwritten when the theme updates.
To add custom presets:
- Add the following code to your child theme's functions.php file.
//Change the Customizer color palette presets
add_action('customize_controls_print_footer_scripts', function () {
  ?>
  <script>
    jQuery(document).ready(function($){
      $('.wp-picker-container').iris({
        mode: 'hsl',
        controls: {
        horiz: 'h', // square horizontal displays hue
        vert: 's', // square vertical displays saturdation
        strip: 'l' // slider displays lightness
      },
        palettes: ['#91472c', '#6d775f', '#f9fffb', '#546a76']
      })
    });
  </script>
  <?php
});
- Change, add to, or delete hex colors in the
palettesparameter. The number of boxes displayed in Customizer will match the number of colors you specify here. - If the color picker square and slider aren't behaving as you want them to, vary the HSL parameters to change where hue, saturation, and lightness are controlled.
- Save the file.