Add a custom shape layer
This tutorial provides instructions on how to register a custom shape programmatically, allowing you to select it from the list of available shapes when configuring top or bottom shapes in row settings.
Even if you don't have a background in development, you should be able to follow this tutorial successfully. For further details on SVG art and an overview of the process involved in registering shape art in Beaver Builder, along with a screenshot showcasing the final outcome, refer to the article on custom shape art.
Another way to include Custom Row Shapes is by copying and pasting your shape's SVG code into the Custom Row Shape user interface (UI) within the Beaver Builder Global Settings.
For additional details, please refer to the Global Settings article.
1. Copy the SVG shape markup
You'll need an SVG file that defines a shape. If you need to create one, you can use a vector graphics tool to create a vector shape and export it in SVG format (or use Inkscape, which uses SVG as its native file format).
Open the SVG file in a text editor. You should see an XML and Doctype declaration at the top of the file, followed by an
<svg>tag.
In the boomerang example, the XML markup for the shape in the exported file is shown below. (Click the file name to see the XML and Doctype declarations at the top of the file.)<?xml version="1.0" encoding="UTF-8" standalone="no"?>
<!DOCTYPE svg PUBLIC "-//W3C//DTD SVG 1.1//EN" "http://www.w3.org/Graphics/SVG/1.1/DTD/svg11.dtd">
<svg width="100%" height="100%" viewBox="0 0 347 85" version="1.1" xmlns="http://www.w3.org/2000/svg" xmlns:xlink="http://www.w3.org/1999/xlink" xml:space="preserve" xmlns:serif="http://www.serif.com/" style="fill-rule:evenodd;clip-rule:evenodd;stroke-linejoin:round;stroke-miterlimit:1.41421;">
<g transform="matrix(1,0,0,1,-10,-38)">
<clipPath id="_clip1">
<rect x="10" y="38" width="172" height="85"/>
</clipPath>
<g clip-path="url(#_clip1)">
<path d="M183.5,38C87.743,38 10,57.044 10,80.5C10,103.956 87.743,123 183.5,123C154.773,113.083 131.45,97.454 131.45,80.5C131.45,63.546 154.773,47.917 183.5,38Z" style="fill:rgb(186,168,168);"/>
</g>
</g>
</svg>Make a note of the values in the
viewBoxattribute, which appears in Line 1 in this example, because you'll use at least the width and height values in the plugin code. The four values (in this example, "0 0 347 85") represent the following information.x position (horizontal position:
0means the left edge of the viewbox). The value10means 10px to the right of the left edge of the viewbox. This is an optional value to set in the plugin code, generally used in cases in which the value is other than 0.y position (vertical position: 0 means the top edge of the viewbox). The value
15means 15px below the top edge of the viewbox. This is also an optional value in the plugin settings.width (initial width of the shape, in pixels). This is a required value in the plugin code.
height (initial height of the shape, in pixels). This is a required value in the plugin code.
Copy the contents of the
<svg>tag, in other words everything in between<svg>and</svg>.
2. Embed the SVG markup in a PHP file
Create a new file in a text editor and paste in the SVG markup that you copied in the previous task.
Add the
fl-shapeclass to the outermost element of the SVG shape definition. In the boomerang example, this is the<g>tag in Line 5 of the following file:<?php
/*Contents of the <svg> element with fl-shape class added */
?>
<g class="fl-shape" transform="matrix(1,0,0,1,-10,-38)">
<clipPath id="_clip1">
<rect x="10" y="38" width="172" height="85"/>
</clipPath>
<g clip-path="url(#_clip1)">
<path d="M183.5,38C87.743,38 10,57.044 10,80.5C10,103.956 87.743,123 183.5,123C154.773,113.083 131.45,97.454 131.45,80.5C131.45,63.546 154.773,47.917 183.5,38Z" />
</g>
</g>Copy Lines 1-4 of the code displayed in the previous step and paste it into the top of your file.
Save the file with a .php extension.
The name of the example file is boomerang.svg.php.
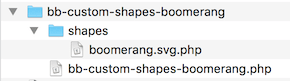
3. Create the folder structure for the plugin
Here's a screenshot of the folder structure created for the boomerang example to help visualize the following instructions. The example plugin is named bb- custom-shapes-boomerang.
![]()
- Create a folder and give it the name (ID) of the plugin. Hyphens are allowed, but no spaces.
- Create a subfolder called shapes. Move the PHP file you created in the previous task into the shapes folder.
4. Create the plugin code
Create a new file in a text editor and paste in the following code.
<?php
/*
Plugin Name: Boomerang Custom Shape for Beaver Builder
Description: Adds a boomerang shape to the list of custom shapes in Beaver Builder
Author: <insert name of plugin author here>
Version: 1.0
*/

function bb_register_custom_shapes() {

  if ( ! class_exists( 'FLBuilder' ) ) {
            return;
  }
  FLBuilder::register_shape(array(

    'label' => __( 'Boomerang', 'bb-custom-shapes-boomerang' ),
    'name' => 'boomerang',

    /* Optional x and y origin values, from SVG viewBox
     ex: viewBox="x y width height" */
    // 'x' => 0,
    // 'y' => 0,
    /* Required width and height values from SVG definition */
    'width' => 347,
    'height' => 85,
    /* Optional aspect ratio setting, from the SVG element - see svg spec */
    // 'preserve_aspect_ratio' => 'none'

  /* Include the path to your artwork */
    'render' => dirname(__FILE__) . '/shapes/boomerang.svg.php',
  ));
}
add_action('init', 'bb_register_custom_shapes');
Make the following changes to the plugin description in Lines 2-7. This information appears in the plugin title and description in Plugins > All plugins on the WordPress admin panel.
Line 3: Change the plugin name to what you want to appear as the plugin title.
Line 4: Change the description to match your shape.
Line 5: Change to the name of the plugin author.
Line 6: Leave the version 1.0 for a new plugin, or bump this up if you revise the published code.Change the label and name:
Line 12: Change the first value (
Boomerang) to the name that you want to appear in the list of shapes in the Beaver Builder row settings. Change the second value (bb-custom-shapes-boomerang) to the name you assigned to the plugin folder in the previous task.
Line 13: Give the shape an ID in lowercase, no spaces.Insert the values from the
viewBoxattribute of the<svg>tag (described in the first task above), as follows.Lines 17-18: (Optional) If the
viewBoxattribute's x and y values are other than 0 and you want the upper left corner of the shape to be offset from the upper left corner of the row by default, uncomment these lines (remove the double slash) and add the values from theviewBoxattribute or the values you prefer.Lines 20-21: Add the width and height values from the
viewBoxattribute from the first task above.
Line 23: (Optional) If you want the default aspect ratio of the shape to stay the same regardless of the aspect ratio of the viewport (in other words, the shape of the row), uncomment this line and add a value. By default, the value isnone. See this article for a description of the possible values.In Line 26, change the name of the file to your PHP file in the shapes folder that contains the SVG shape definition.
Save the file to the top-level folder with the plugin name. In other words, the plugin folder should be structured as shown in the following screenshot.
5. Compress the file and install the plugin
- Create a zip file containing the top-level folder (in this example, bb-custom-shapes-boomerang ) and its content.
- In the WordPress admin panel, go to Plugins > Add new. Upload, install, and activate the zip file in the normal fashion.
When the plugin is installed, you should see your plugin title in the list of installed plugins (in this example, "Boomerang Custom Shape for Beaver Builder").
6. Test the plugin
- Open a page for editing in Beaver Builder.
- Add a row or open an existing row.
- On the Settings tab, scroll down to the Top shape or Bottom shape section and click the Shape field to see the list of shapes. Your shape should appear at the bottom of the list.
- Select the shape and test the other fields, such as width, height, color, transformations, and skew, to make sure they are all working correctly.
If these fields don't respond to the values you enter, verify that
you inserted the fl-shape class into the outermost tag of the SVG
definition.