Subscribe Form
Use the Subscribe Form module to provide a form for visitors to subscribe to an email list or to collect email addresses for your own use. See the list of supported email subscription services at the end of this article.
The Subscribe Form module displays a simple form with five parts:
- Name (can be displayed or hidden; if displayed it's a required field)
- Email address
- An optional Terms & Conditions checkbox, for which you can customize the terms and the checkbox label.
- Subscribe button
- An optional Google reCaptcha checkbox to reduce the incidence of junk submissions.
Example in use
Here's an example of the Subscribe Form module as used in the Sign Up content template included with the Beaver Builder plugin. An example of the Terms and Conditions checkbox has been added to the template. If you enable this option, users must select the checkbox to submit the form successfully. If they don't, they receive the message "You must accept the Terms and Conditions."
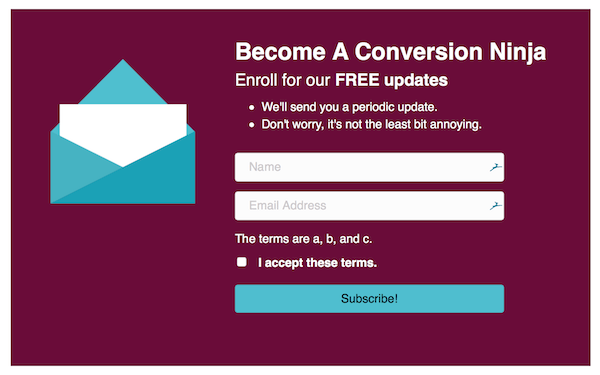
This template consists of a single row with two columns. In the left column, there's a Photo module for the envelope image, and in the right column there's a Text Editor module for the text and then the Subscribe form beneath that. In the template, the fields and the button are stacked, but you can also display them inline, which means the fields and the button are laid out horizontally for a more full-width presentation, for example in a ribbon top bar banner.
Notifications and confirmations
Email notifications depend on the service and your account settings there. For example, if you connect a MailChimp account, after the subscriber clicks Submit, MailChimp takes over and sends a notification email. The list owner doesn't get notified of the subscription unless that notification is configured in the Mail Chimp account.
On the other hand, if you choose Email Address as the service, you have to supply an email address that the subscription information will forward to. In this case, you receive a notification with the subject line in the Subscribe Form Signup field, but the subscriber doesn't get a notification by default. That's something you'd have to configure in the email account that you're forwarding to, such as setting up an autoresponder.
You can choose whether the person who submits the form gets confirmation on screen, and if so, whether clicking the button sends that person to another URL or displays the confirmation message in place of the form. You can also style the button label (the default label is Send ), add a button icon, change the button color, and so on.
Supported services
The Subscribe Form module supports a connection to the following services:
- ActiveCampaign
- AWeber
- Campaign Monitor
- Campayn
- Constant Contact
- ConvertKit
- Drip
- Email Address This choice sends the subscriber name and email to an email address of your choosing. You must then handle it in that email account--for example, set up an autoresponse to the subscriber, set up an email filter to channel the subscribe emails into a special folder, add them to your contact list, and so on.
- Enormail
- GetResponse
- Godaddy Email Marketing
- Groundhogg Note: You must have the Groundhogg plugin installed for Groundhogg to appear in the list in the Subscribe Form module.
- Hatchbuck
- iContact
- iContact Pro
- Infusionsoft
- Mad Mimi
- MailChimp
- MailerLite
- Mailjet
- MailPoet Note: You must have the MailPoet plugin installed for MailPoet to appear in the list in the Subscribe Form module. MailPoet shows all of your lists for you to choose from.
- Mailrelay
- Mautic
- Ontraport
- SendinBlue
- Sendy
Settings
General tab
If you're mocking up a website but don't have a subscription service enabled yet, choose Email address in the Service field. That way you can keep the form in the layout and connect the service later.
| Section | Field | Description |
|---|---|---|
| Service | The mail service you want to use, or choose Email address if you just want to get notifications rather than use a subscription service. | |
| Account | Depending on which service you select, you'll get the appropriate fields to connect to your service account. If you chose Email address for your account, provide the email address where you want to receive notifications of subscribers. | |
| Structure | Layout | Choose Stacked (vertical layout) or Inline (horizontal layout). |
| Name field | (Default is Show.) Show or hide on the form. | |
| Name field text | (Default is "Name.") Modify if you want to customize the field's placeholder text. | |
| Email field text | (Default is "Email Address.") Modify if you want to customize the field's placeholder text. | |
| Terms and Conditions checkbox | (Default is Hide.) If set to Show, new settings appear to customize the text label and to enter the terms and conditions. If you enable this setting, users are required to accept them for form submission to be successful. | |
| Success | Notification subject | The subject of the notification email that the subscriber receives. The default subject is "Subscribe Form Signup." |
| Success action | Show message means the confirmation message is displayed in place of the Subscribe Form. Redirect lets you provide a URL to a different page where you can provide your own message. | |
| Message | (Optional) Enter a custom message for the Show message confirmation. Note that the text you provide here doesn't appear in the email notification. |
Button tab
| Section | Field | Description |
|---|---|---|
| Button text | (Optional) Enter custom text for the Subscribe button. | |
| Button icon | Button icon | (Optional) Select an icon for the Subscribe button. |
| Button style | Button padding | (Optional) Specify the number of pixels of space between the button edge and the button text. |
| Button text | Button text color | (Optional) Choose the color of the button. Note: If you're using the Beaver Builder Theme, the default button and button hover colors come from Customize > General > Buttons, but you override the default colors with this setting. |
| Button text hover color | (Optional) Enter a hover color. | |
| Button typography | The standard typography section to style the button text. | |
| Button background | Button background color | Set the fill color for the button in the resting state. |
| Button background hover color | Set the button's fill color on hover. If this setting is left blank, the Background color setting applies to hover also. | |
| Button background style | Flat: consistent fill color. | |
| Gradient: gradient of the background color, lighter on top and darker on the bottom. | ||
| Button background animation | Disabled by default. If set to Enabled, there's a 0.2-second linear transition from resting state to hover state. | |
| Button border | Button border | (Optional) The standard border settings. |
Captcha tab
See this article for instructions on how to implement Google reCaptcha.
Advanced tab
There are all the usual Advanced tab settings for margins, visibility, animations, and advanced HTML settings.
Accessibility
The Subscribe Form module's rendered HTML output contains a number of labels and classes to help screen readers understand the form. Here's an example.
<div
  class="fl-subscribe-form fl-subscribe-form-stacked fl-subscribe-form-name-show fl-form fl-clearfix"
>
  <div class="fl-form-field">
    <label for="fl-subscribe-form-name" class="hidden">Name</label>
    <input
      type="text"
      aria-describedby="name-error"
      name="fl-subscribe-form-name"
      placeholder="Name"
      id="fl-subscribe-form-name"
    />
    <div class="fl-form-error-message" id="name-error">
      Please enter your name.
    </div>
  </div>

  <div class="fl-form-field">
    <label for="fl-subscribe-form-email" class="hidden">Email Address</label>
    <input
      type="email"
      aria-describedby="email-error"
      name="fl-subscribe-form-email"
      placeholder="Email Address"
      id="fl-subscribe-form-email"
    />
    <div class="fl-form-error-message" id="email-error">
      Please enter a valid email address.
    </div>
  </div>

  <div class="fl-form-button" data-wait-text="Please Wait...">
    <div class="fl-button-wrap fl-button-width-full fl-button-left">
      <a href="#" target="_self" class="fl-button" role="button">
        <span class="fl-button-text">Subscribe!</span>
      </a>
    </div>
  </div>

  <div class="fl-form-success-message">
    <p>
      Thanks for subscribing! Please check your email for further instructions.
    </p>
  </div>

  <div class="fl-form-error-message">
    Something went wrong. Please check your entries and try again.
  </div>
</div>